Frequently Asked Questions: Getting Started with XCS 200 Resistance Trainer Models
Resistance Trainer Setup Tips Below for Recumbent Cycling, Arm Cycling, Bed Bike, and More!
(XCS 240, XCS 260, and XCS Pro)
Below are frequently asked questions regarding setting up and using our XCS 200 resistance trainer models. The Excy XCS 200 Series owner’s manual can help answer questions additional questions. Download the owner’s manual here.
Explore exercise setup tips at www.excy.tips. Always consult your doctor before starting a new exercise routine. You should never experience pain when using Excy.
Watch the XCS 200 Resistance Trainer Setup Videos to Get Started!
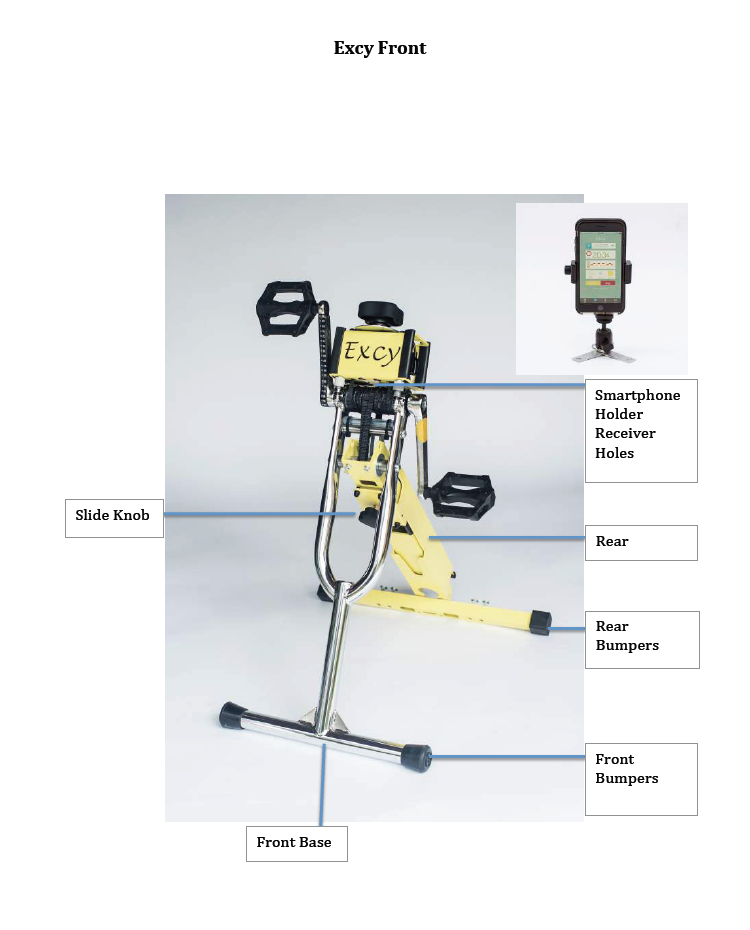
What Are the Key Excy XCS 200 Resistance Trainer Parts?

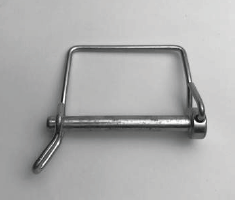
 The Excy Clevis Pin
Use the Clevis Pin to adjust the heights of the Excy system. Remove the pin for all weight-bearing exercises (standing and planking). Always align and place the Clevis Pin through the Clevis Pin Hole Receiver. A second pin is provided for those who prefer a tighter fit.
Note the suggestion for placement of the Clevis Pin for all exercises here. Placement is key for the optimal recumbent bike, upper body ergometer, and resistance trainer positions.
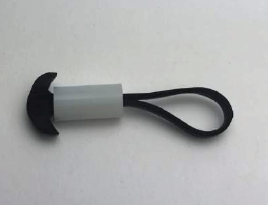
Keeper Post Band(s)
Use the Keeper Post Bands to keep the Excy Keeper in place. The Keeper Post Bands fit around the Slide Keeper Receiver Posts and the Bar Keeper Receiver Posts. They are critical to prevent the Keeper from coming undone. Watch a sample video with Excy being setup as a recumbent exercise bike.
Snap Rivet
Use the Snap Rivet to finalize assembly for the XCS 260 and XCS Pro (insert into Snap Rivet Hole). This assures the Locking Holes are accessible for recumbent exercise bike, arm bike, bed bike, and resistance trainer positions. Watch setup video (minute 1:21).

Toggle Ties
Toggle Ties are optional to firmly tie the Excy Keeper to a chair in the recumbent position or to tie Excy to a chair as a floor cycle.

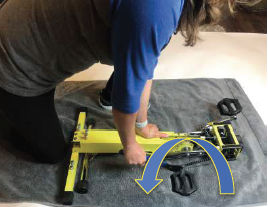
How Do I Open and Close Excy XCS 200 Resistance Trainer Models?
The Excy full body portable exercise bike and resistance trainer system was designed to open and close for easy storage and transport. When folding, watch for pinch hazards. Always tighten the Slide prior to opening and closing.
Opening the Excy XCS 200 Resistance Training System
1. Place one hand on the Top and remove the Adjustment Pin from the Clevis Pin Hole. To remove the Adjustment Pin, release the spring part from around the end and rotate it to other side of the pin where it is attached. Grab the free end of the spring and pull the pin out while twisting back and forth.
2. Leave one hand on the Top. Use the other hand to lift the Rear by holding onto the Slide Bumpers.
3. Pick your workout position (see workout adjustment section).
4. To use Excy in the standing position, the Adjustment Pin MUST be removed completely and the Slide fully inserted. Place the Adjustment Pin in the top Pin Holder when not in use to avoid losing it.
Closing the Excy XCS 200 Resistance Training System
1. Make sure the Slide is fully inserted until the Slide snuggles against the Snap Rivet Hole. Make sure the Slide Knob is closed tightly.
2. Place one hand on the Top and unlock the Clevis and remove the Adjustment Pin from its current position.
3. Pivot the Rear downward and close completely.
4. Insert the Adjustment Pin through the Clevis Pin Hole. Lock the Clevis to transport.
Watch the video on taking Excy out of the box for more details:
How Do I Open and Close the Slide in the XCS 260 and XCS Pro?
The Excy Slide allows the Excy XCS 260 model and Excy XCS Pro to be easily adjusted to your inseam for cycling your legs. It is also helpful when pedaling arms in bed or using the rowing position. The configuration is made possible by pulling out the Slide and locking it into position using the Slide Knob.
Opening the Excy Slide in the XCS 260 Model and XCS Pro
1. Loosen the Slide Knob by turning it clockwise while facing the back of Excy (stop once you feel increased knob rotation resistance). It requires only a small turn.
2. Hold the Rear in one hand and use the other hand to hold the Top firmly. This helps keep it stable.
3. Grab the Slide Bumpers (or the Bar if attached) and pull the Slide out by the Slide Bumpers (Lightly shaking while twisting back and forth will help with adjusting). This only requires small levels of force.
4. Adjust the Slide extent as is suitable for to your height (25-30 degree angle for knees 5-10 degree angle for elbows).
5. Once you have the Slide adjusted as suits to your height, twist the Slide Knob into a tight position. The Slide Knob only needs to be firmly tightened. Do not tighten more than necessary to keep the Slide from moving. Over tightening may cause damage or make it unnecessarily hard to loosen.
6. To close the Slide, reverse the procedure and push the Slide in until it reaches the Snap Rivet.
Watch the video on taking Excy XCS 200 resistance training models out of the box for more details:
How do I Add the Snap Rivet to the XCS 260 and XCS Pro?
Only Applicable to XCS 260 and XCS Pro with the Slide Feature
If you have ordered a version with a Slide (the XCS 260 or XCS Pro), it will be shipped more compressed than intended for normal use. Release the Slide by loosening the Slide Knob. Then, move the Slide away from the Front until you see the Snap Rivet Hole. Tighten the Slide Knob to keep the Slide in that position. You will find a Snap Rivet with Washer held to the clevis area with a rubber band (see below images).
Finding your Snap Rivet


Adding the Snap Rivet
Hold the top of the Snap Rivet in your hand. Make sure that there is a gap between the bottom of the top and the bottom part of the Snap Rivet. Then place the washer over the bottom part of the Snap Rivet. Then put the bottom part of the Snap Rivet (with the washer still in place) into the Snap Rivet Hole. Then push the top of the snap rivet until it seats against the bottom part of the snap rivet. It should now be securely in place, and the Slide will not go any farther forward then where the snap rivet is. This assures the Locking Holes are accessible and the Slide top does not get paint damage.
Watch the setup video to learn how to use the Slide feature with Excy as a recumbent exercise bike and resistance trainer (minute 1:21):
How Many Height Adjustments are Available in the XCS 200?
Excy can be adjusted to four heights. This enables total versatility to use Excy as a legal pedal exerciser, upper body ergometer, and full-body resistance trainer.
- Without Pin. It is mandatory to remove the pin standing and planking resistance trainer workout positions and suggested for cycling and step cycling at a desk, as it’s the lowest position to the floor. See positions here.
- Hole #1: This position is recommended for using the Excy Keeper while seated on a couch or chair in the recumbent bike resistance training position.
- Holes 2 and 3: These positions place Excy higher off floor or table surfaces. You can choose which of these holes works best in combination with how far you have the Slide extended. With variations of Slide extension and the use of Holes 2 or 3, you can go from being very tall and cranking while standing with Excy on a table, to having Excy on the floor and you are cranking from a seated position.
- Use the bottom hole while riding Excy in the recumbent bike position from a chair or couch. Without it, it will not feel as stable.
Why Are There Two Pins?
We have provided two pins for workout preferences. The smaller pin is easier to insert, but allows some flexibility in movement. The wider pin requires a little more force to insert, but eliminates all flexibility while in use. Some people might prefer the larger pin for intense exercises to eliminate all movement. This could be especially true for the recumbent bike position or using Excy at high resistance for resistance training.
Watch the setup video for more details:
https://www.youtube.com/watch?v=hxnUUGTCCfQ
How Do I Adjust the Height of the XCS 200 Resistance Trainer Models?
Adjust the heights by using the provided Clevis Pin in coordination with the Locking Holes. This will allow you to secure preferred leg pedal exercises, arm ergometer, and resistance trainer workout positions.
1. Remove the Adjustment Pin: release the spring part from around the end and rotate it to other side of the pin where it is attached. Grab the free end of the spring and pull the pin out while twisting back and forth.
2. Align the Locking Holes to your preferred height by pivoting the Rear up or down. Note that when the Slide and Bar on installed, you may find it easier to set those on the ground and hold onto and rotate the Front when choosing and aligning the holes.
3. Once the Lock Holes are aligned with the Clevis Pin Holes, insert the Adjustment Pin through the Locking Holes and push it through the Clevis Pin Holes. This might require a little wiggling and force the first few times. Hold onto the loose end of the Clevis Spring to make it easier to insert while twisting a little back and forth. Once the head of the pin is in contact with the side of the Rear, rotate the Clevis Spring to the other side and clip it over the end of the pin.
Always Remove the Pin for Standing Cycle and Body Weight Positions
When using Excy in the standing unicycle or step cycle position, the Adjustment Pin MUST be removed completely and the Rear fully inserted. Place the Adjustment Pin in the top Pin Holder when not in use to avoid losing it.
Watch the video for setup details:
Explore different workout positions with Excy as a leg pedal exerciser, arm bike, or resistance trainer at your leisure.
How Does Resistance Work and Adjust for the XCS 200?
Resistance range is 2-70 pounds (variable resistance / bi-directional resistance works in both directions.
Excy’s unique approach to bi-directional resistance based on a tensioning mechanism that is bidirectional and can be easily dialed up or down with the simple twist of the Resistance Knob.
Right Tighty, Left Loosey
Turn right for harder resistance and you will see the Resistance Indicator Tubes rise. Then, turn left to make the tension easier and the Resistance Indicator Tubes will lower. It is best to start with an easy resistance level while your body gets use to new exercises. You generally can use easier resistance levels for aerobic type exercising and higher resistance levels for strength type exercising. At higher tensions, turning the Resistance Knob will be easier if a reverse direction for is applied to one of the pedals.
*WARNING! Do not forcibly turn the Resistance Knob in the Excy XCS 200 resistance trainer beyond its loosening stop point or it will break and void your warranty.
Watch the XCS 200 setup video for more details:
https://www.youtube.com/watch?v=hxnUUGTCCfQ
What is the Excy Keeper?
The patented Excy Keeper uses your body weight, whether in a standing, kneeling, lying, or sitting position, to make sure that the Excy system does not scoot during use. The Keeper Holes are designed to be placed over the Bar Keeper Receiver Posts and Slider Receiver Posts. The additional holes are for use with the Toggle Ties.
Watch the setup video to see how the Excy Keeper works to make the portable cycling system work as an exercise bike, bed bike, floor pedal bike, and a resistance trainer. Follow the proper instructions for each exercise position.

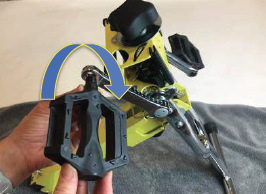
How Do I Remove or Add Pedals to the Excy XCS 200?
Any 9/16″ pedal can be added to the Excy system, whether it’s for your hands or feet. To change the pedals you will need a 15MM pedal wrench (we recommend the Park Tool PW-5 or a similar in quality bike wrench). To get started, fold Excy flat (in its closed position) and lay it on hard surface with the Excy name face down and the Rear (where the Keeper attaches) towards you. Use a cloth to protect your surface while pedaling Excy as a resistance trainer.
Removing the Pedals from the Excy XCS 200 Models
Rotate the crank arms to position the pedal you are removing to be closest to you and against the hard surface. Put the wrench over the flats on the pedal axle right next to where it connects to the crank arm. Have the other end of the wrench towards you. Pull the wrench back towards you and also press the wrench down towards the hard surface. With your other hand, press and hold Excy down against the hard surface, as it will want to lift upward in response to your pulling/pressing on the wrench. Keep your fingers away from the direction you are moving the wrench. The pedal should start un-threading. Keep turning the pedal axle in that same direction until it is loose. Repeat for the other pedal / side.
Adding the Pedals to the Excy XCS 200 Resistance Trainer
Place Excy in the normal open operating position with the Excy name faced away from you. Most pedals have L or R (left or right) markings on them. Align the pedal axle threads with those in the crank arm, and rotate the
pedal axle with your fingers to get started. Rotate such that the top of the pedal axle spins away from you (“forward” direction). Do the same for the other side. If the threads do not start, then most likely you have the wrong pedal for that side. Simply try it on the other side. After you have tightened the pedal treads as much as you can with your fingers, fold the system and lay it on a hard surface with the Excy name face down and use the wrench to continue turning in the forward direction (away from you) until the threads are as tight as you can make it. Repeat for the other pedal.
How Do I Add the Smartphone Holder to the Excy XCS 200 Models?
The new Excy Smartphone Holder makes it easy to connect your phone to the Excy system and open up the possibilities our mobile coaching platform for a hands-free built in screen experience. You simply connect the Smartphone Holder to any XCS 200 model, insert your phone into the holder, and then fire up the Excy Mobile Coach for live, on-demand, and guided workouts anywhere, anytime. It’s like having your own personal resistance trainer coach in your back pocket!
What Are the Safety Precautions for the Excy XCS 200 Models?
Before your first ride, you should read your Owner’s Manual and make sure you understand all aspects of the Excy resistance training system. This includes different accessories, safety precautions, and exercise resistance training positions. We invite you to follow us on social media for training ideas. Our social channels can be found at www.excy.social. Call (425-205-9444) or email excy (at) excy (dot) com
Top 10 Safety Tips Information Before Riding!
1. Consult a physician prior to commencing an exercise program. If at any time, you feel faint or dizzy, or experience pain, stop and consult your physician. It can be hazardous to over-exert yourself during exercise. Using the Excy resistance training system should be an enjoyable exercise experience, whether using the system vigorously, moderately, or for a light workout.
2. If you have an injury or medical condition, work directly with your physical therapists and doctor. Excy tutorials are not a replacement for working with your physical therapist or doctor to create a custom program unique to your situation.
3. Read and understand the complete Owners Manual. Download it here.
4. Understand all WARNINGS on the Excy portable exercise bike and resistance training system and accessories.
5. Do not use Excy with unstable chairs, tables, or other surfaces. Doing so can result in serious injury and property damage. Protect surfaces with towels or mats. If you feel unstable in a chair, place it against a wall.
6. Always make sure Excy is firmly attached to the Excy Keeper and Bar prior to use. Failure to secure firm connections and tension between Excy and the Keeper and/ or Bar while in use can result in injury or property damage.
7. Make sure the Clevis Pin is always inserted into the Clevis Pin Holder. Do not use the Clevis pin during body weight exercises (standing and planking).
8. Confirm that all positional accessories are securely engaged.
9. Please do not have children or animals directly next to the Rear or Front base while pedaling.
10. Do not use petroleum-based products to clean your system.
Heat Awareness
Excy’s approach to resistance training is based on a tensioning mechanism that can be easily dialed up or down. As workout intensity and the amount of power being produced increases, the friction creates heat that extends into the Cranks. Today, we measure the power of exercise output using Thermal Tape with colors that brighten to represent your intensity. The temperature colors will fluctuate throughout your workout based on the power you produce during your workouts. Do not touch the Cranks or axle during or immediately after a workout. During your first few very intense workouts, the system might produce a smell, which is normal. Touching the Upper or Cranks above temperatures of 130 degrees can cause injury if the person doesn’t immediately let go. In particular, children should always be supervised and not be allowed to touch Excy in any capacity during use or immediately following a workout until the temperature subsides.
*WARNING! To avoid a burn injury, do not touch the Cranks after a workout. Do not let children touch the Cranks.
Special Note to Parents (Human and Furry)
Children will be naturally curious and may articulate a strong desire to play with the Excy resistance training system. However, its important that children not be allowed to spin the cranks or open and close the device without adult supervision and assistance. Do not allow them to sit in your lap while using Excy as this causes instability and could result in injury. In addition, do not allow them to touch Excy for any reason while you are using it. Children or pets should not be allowed to sit, stand, or play near the Front Base or directly on either side of Excy while in use, as you could lose stability and it could fall on them and cause injury. We strongly encourage using Excy as a family. So, if you want your children or animals present, have them sit, stand, or play outside the fall surface area of the Excy resistance training system.
*WARNING! Do not allow children or animals near the Rear or Front Base while pedaling.
Caution Materials
Excy is crafted with a steel frame and durable metal pieces. The system is powder coated and has heavy-duty steel crank arms and uses lubricants. Should you come into contact with particles and substances like: paint chips; lubrication particles or any other chemical substances, avoid inhaling and wash hands after contact. Swallowing small amounts during normal handling is not likely to cause harmful effects, but keep small children away or under constant supervision.
California Proposition 65
Product components contain chemicals known to the State of California to cause cancer, birth defects, or reproductive harm. This Notice is provided in accordance with California’s Proposition 65. If you would like additional information, please contact us at excy (at) excy (dot) com.
Is There a Weight Limit When Using Excy as a Portable Bike or Resistance Trainer?
There are no weight limits when using Excy as a portable recumbent exercise bike, upper body ergometer, or bed bike resistance trainer. Please confirm the weight limitations and stability of any chair that you will use Excy with prior to use and follow manufacturer guidelines. Only use Excy as an upper body arm bike on stable surfaces. For higher level resistance training, it’s especially important to have a stable surface.
When using Excy XCS 200 models for the step cycle and unicycle positions, there is a weight limit of 220 pounds: Always remove the Clevis Pin.
What Are the Size Measurements for Excy XCS 200 Resistance Trainer Models
Weight of the Portable Exercise Bike Resistance Trainer
- 13.3 pounds XCS 240
- 14 pounds XCS 260
- Keeper Weight: Weight: .7 pounds / Measurements: L61” x W12” (unrolled) / L12” x W1.5” x H 1.5” (rolled)
Footprint
- Portable / Closed (with Rivet / Slide version): L30” x W15”x H5.5”
- No Pin: L33”x W18.5” x H16.75”
- 1st Hole: L31” x W18.5” x H19”
- 2nd Hole: L28”x W18.5”x H22”
- 3rd Hole: L33” x W18.5”x H25”
How Do I Get Started Pedaling Excy as a Portable Exercise Bike?
Take time to pedal slowly at the easiest levels until it feels smooth and controlled to get a feel for how it works. Applying too much resistance or trying to go too hard at the easiest or hardest levels without first getting a feel for how to perform this new way of cycling could cause you frustration or even make Excy fall.
Start Easy to Get Familiar with Riding
It won’t take you long to get a feel for it, so use your first ride to familiarize yourself with keeping it smooth at the easiest level, which will allow you to more quickly appreciate all the Excy rotation features, controls, and performance. In addition to its small form factor and resistance levels, there is no flywheel, so the system doesn’t assist you throughout your resistance training workout. At first, this might feel strange, almost like it’s “sticking” at the top of the rotation. There’s a big advantage to pedaling, spinning or cranking Excy with controlled forces through that feeling of it “sticking” that you can’t get from a flywheel experience.
Explore the Excy portable exercise bike, upper body ergometer, bed bike and other resistance trainer exercise positions for more details.
How Do I Position My Feet When Pedaling Excy?
You should cycle with the balls of your feet on the pedals and with your feet facing straightforward. Your feet should be close to the crank arm, but never so close that your ankle will hit on its way through the stroke. Avoid splaying your feet outwards or rotating them inwards while cycling a full rotation and try to drive your feet forward, backward, and around in a smooth circle or cranking position at higher levels of resistance (at higher levels of resistance, the experience will feel more like cranking up a hill).
We Like Barefoot Fitness
Our favored foot position is barefoot or in socks, as that allows your toes to get involved in resistance training pedaling in smooth circles. When wearing shoes, make sure they are suitable to allow you to maintain a fixed and stable position on the pedals, especially if standing on the system.
Also, remember you can use any 9/16” standard pedal threads if you prefer to use a different pedal.
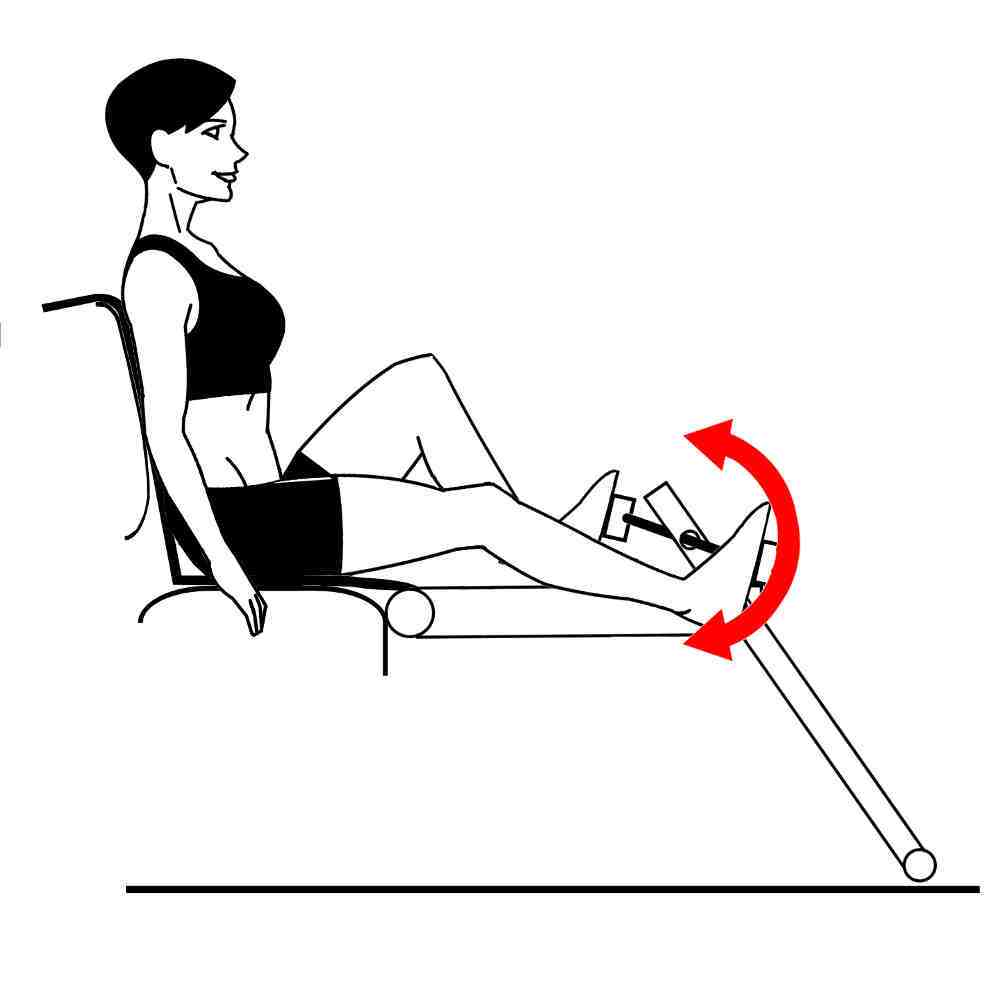
How Do Position My Knee While Pedaling Excy as a Leg Pedal Exercise Bike?
While cycling Excy, you should always have a bend in your knee, about a 25-30 degree angle for the greatest pedaling power, comfort, and to prevent injury. This includes resistance training pedaling while sitting, standing, or lying down.
Pedal forward with the balls of your feet and make sure you have a 25-30 degree bend in your knee (your knee should never be fully extended). If you have too little or too much angle, adjust the Slide. Your feet should be close to the crank arm, but never so close that your ankle hits on its way through the stroke. Avoid splaying your feet outwards or rotating them inwards while cycling. The favored foot position is barefoot or with socks. When wearing shoes, make sure they are suitable to allow you to maintain a fixed and stable position on the pedals.
How Should My Hands Be Positioned with Pedaling Excy as an Upper Body Ergometer
There is likely a common default perception that some type of special pedal should be used for arm cranking. That is true, but the type of pedal that would provide a marginal benefit over our flat pedal would cost several hundred additional dollars. We believe we have found the perfect alternative with our flat pedal.
The most ergonomically comfortable and safe hand position is grabbing the end of the pedals with palms facing each other. But having your palms flat on the pedal might be more comfortable for you while hand cycling Excy as a resistance trainer.
Avoid Pinch Zones
Whatever your hand position, make sure your thumb is not near the crank arm as it may get pinched during cranking. You should always have a slight bend in the elbow when the crank is in the furthest position away from the body (focus on a 5-10 degree bend at the elbow).
Ensure Proper Position of Hands
Avoid locking arms at extension by adjusting your position while standing or sitting. Initially, intensity, resistance, and duration should be kept fairly low. Try starting with 5-10 minutes at a light resistance level. Most will find even this is quite difficult. The muscles of the upper body are smaller and weaker than their lower body counterparts, and they are not accustomed to working in this manner, making even 5-10 minutes seem quite challenging. Don’t be discouraged; you will improve with time just as you would with any other form of aerobic or strength training.
Watch Your Posture
Whether using Excy to cycle your arms while seated on the floor or seated or standing at a table surface, proper posture is critical while training. Keep your chin up; back straight, shoulders back, and your torso/core strong. Hand cycling gloves can be used for added comfort.
Explore proper exercise setup for popular Excy positions here.
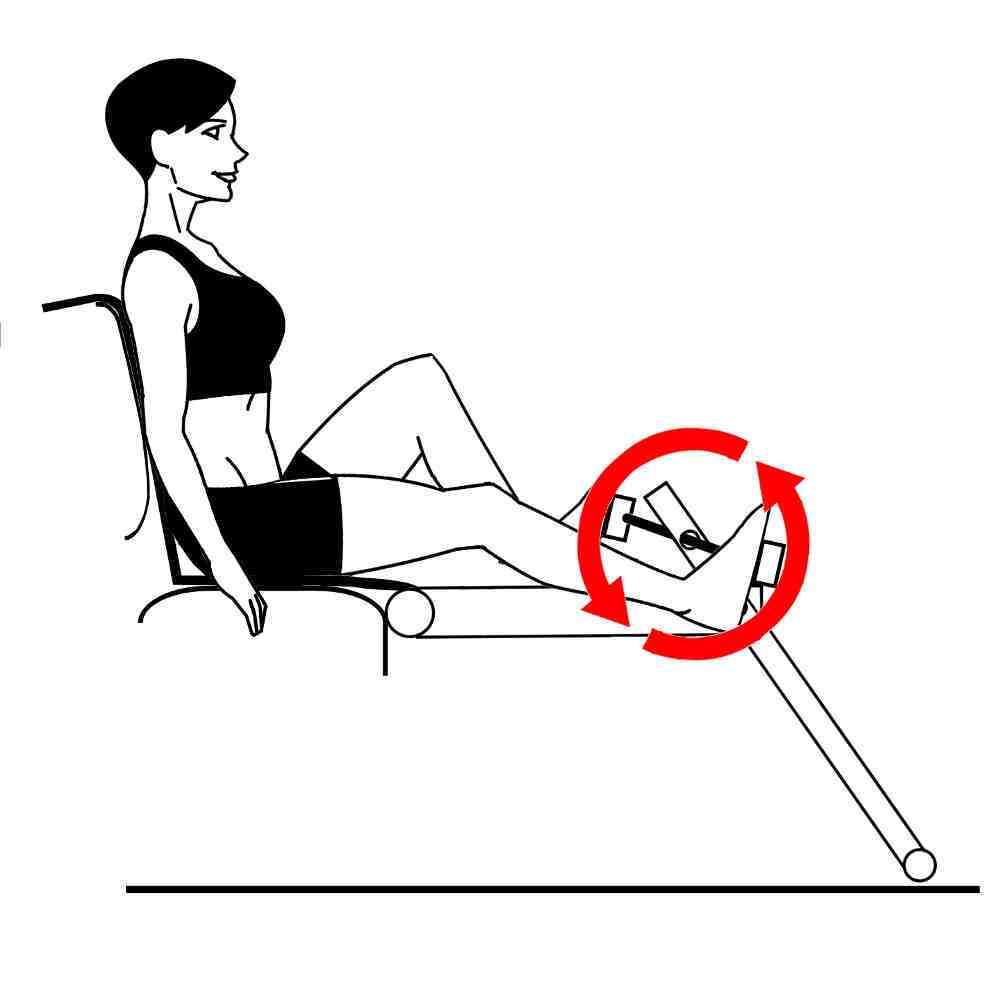
How Do I Setup the Excy XCS 200 Series as a Portable Recumbent Exercise Bike?
To use the Excy XCS 200 models as a recumbent exercise bike resistance trainer:
- Put the pin in the bottom hole for the optimal recumbent workout.
- Lay the Keeper on a chair or couch with the Keeper End Holes being slightly in front of the seat (place a towel down to protect your surface). It is easiest to use the end of the Keeper that has just two holes along the edge. Optionally and only when used with a Bar, the end that has four holes along the edge can be used.
- Sit on the Keeper. Make sure it stays slightly in front of the seating surface. Adjust the Slide to your height.
- Place the Keeper Edge Holes over the Slide (or Bar) Keeper Receiver Posts. First work one of the Keeper Holes over one of the Posts and press it down and over so that the second Keeper Hole has space to go over the second Post.
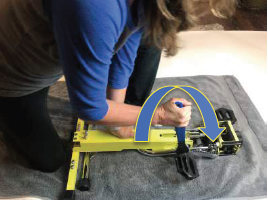
- If the Posts you are attaching to are facing upward (as on the Removable Bar Option), then you will need to place the supplied Retainer between the Posts to prevent the Keeper from coming loose. Take the end without the rubber loop and press it between the Posts. Then take the rubber loop and wrap it around the outside of each post and fully over the other side of the Posts (see photos).
- Place one foot on an Excy pedal and one on the floor. Add the other foot and start cycling.
Watch the setup video to see how to use the Excy XCS 200 series as a portable recumbent exercise bike:
See additional setup and workout information for using the XCS 260 or XCS Pro as a recumbent exercise bike. The XCS 240 can also be used in this recumbent position, you will just have a gap between the bar and the front of the chair.

Added Support for the Portable Recumbent Bike and Leg Pedal Exerciser Resistance Training Position
For those who want to crank higher or need more support to pedal, we invite you to use the toggle ties while using Excy as a chair exercise bike or leg pedal exerciser for resistance training.
The Excy Keeper comes with two Toggle Ties that can be used to tether the Keeper to the chair as shown in the picture below. In MOST circumstances, MOST people do NOT need the tether.
The tether may be needed if you use Excy at very high resistance for maximum strength training or if using Excy at high intensity with high resistance. Before you decide to use the tether, try using the Keeper simply using your body weight. Tethering can also be helpful for seniors and children to make it easier to start and stop riding Excy. Tethering can also make repeated use of the Keeper on the same chair easier, as tethering holds the Keeper in the desired position.
Excy Keeper Setup Steps
- Place the Keeper on a chair with the Keeper End Holes at the forward edge of the front of the chair and the remaining material over the back of the chair.
- Smooth the Keeper on the chair and create a flat, firm surface by pushing the material against the back of the chair prior to tethering.
- Secure the Toggle Tie to one side of the chair. The easiest way to do this is to grab the string between the Toggles and at least 6 inches away from the Toggle and pull the strings together with the other hand to make a loop. Route this loop around the backside of a chair leg and bring it towards the front. Insert the rest of the Toggle Tie including both toggles and all the string through the loop. Pull on the longest string to close the loop while not letting the Toggle pass through the loop.
- Insert the Toggle on the opposite loose end into the Center Keeper Hole (or an Edge Hole if connecting to the Bar Posts). Adjust the length between toggles so that the Keeper is in the right position. The easiest way to adjust the length is to hold the toggle with one hand and then pull on the knotted end of the string with the other hand until the string between toggles is the desired length. Then grab the side of the toggle together with the string heading towards the other toggle. Form a loop to form on the top side of the Toggle by working the knotted side loose string up through the Toggle hole. Pass the knotted side string through that loop and pull it tight until the loop closes. You will find this easier to do when the Toggle is not in Keeper Hole. Do it outside of the hole, put it in the hole and check the length, then do again until the right length is achieved.
- Repeat on the other side.
- Ride Excy to make sure the distance and tension is correct before starting your workout. Adjust if necessary.
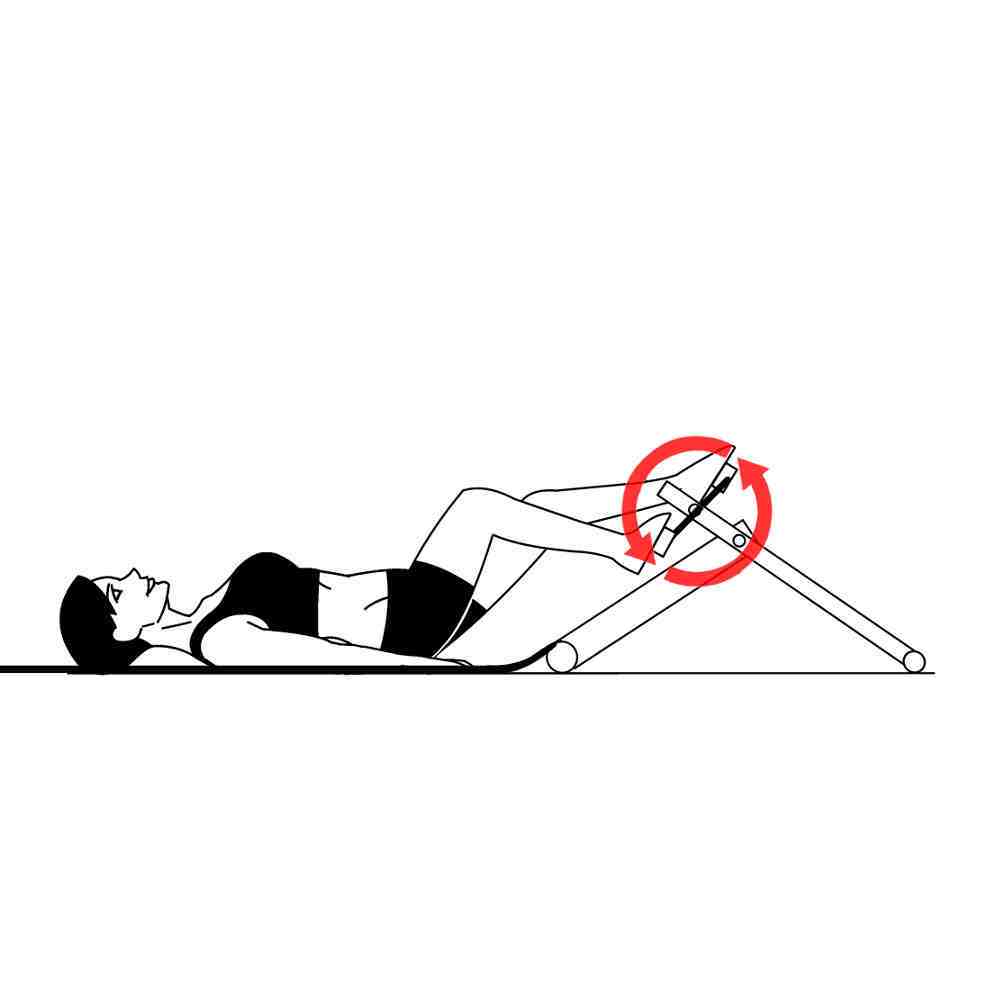
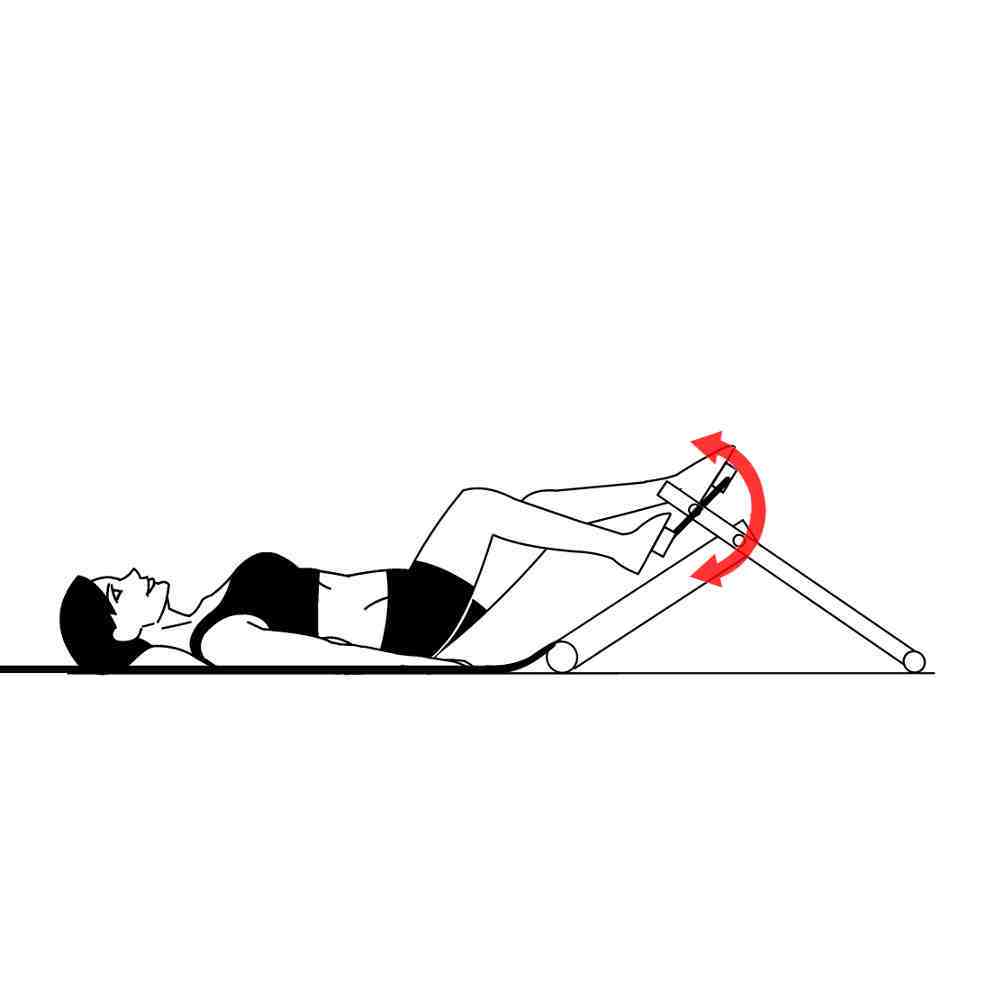
How Do I Setup Excy XCS 200 Models for Bed Exercises or to Exercise Lying Down?
All the Excy XCS 200 models can be used for resistance trainer bed exercises or floor exercises while lying flat in a bed or on the floor.
- To get started, lay the Keeper on the floor or bed to pedal legs
- Attach the Excy System and the Keeper by placing the dual centered Keeper End Holes over the Slide or Rear upward facing Receiver Posts.
- Sit on the Keeper as close as you can to where the Receiver Posts and Keeper meet the floor, while making sure that your knees are bent at a 25-30 degree angle or your arms are bent at a 5-10 degree angle.
Watch the video for more details on how to use Excy to pedal legs in bed or on the floor:

For more setup instructions, visit the the workout page for lying down exercise cycling.

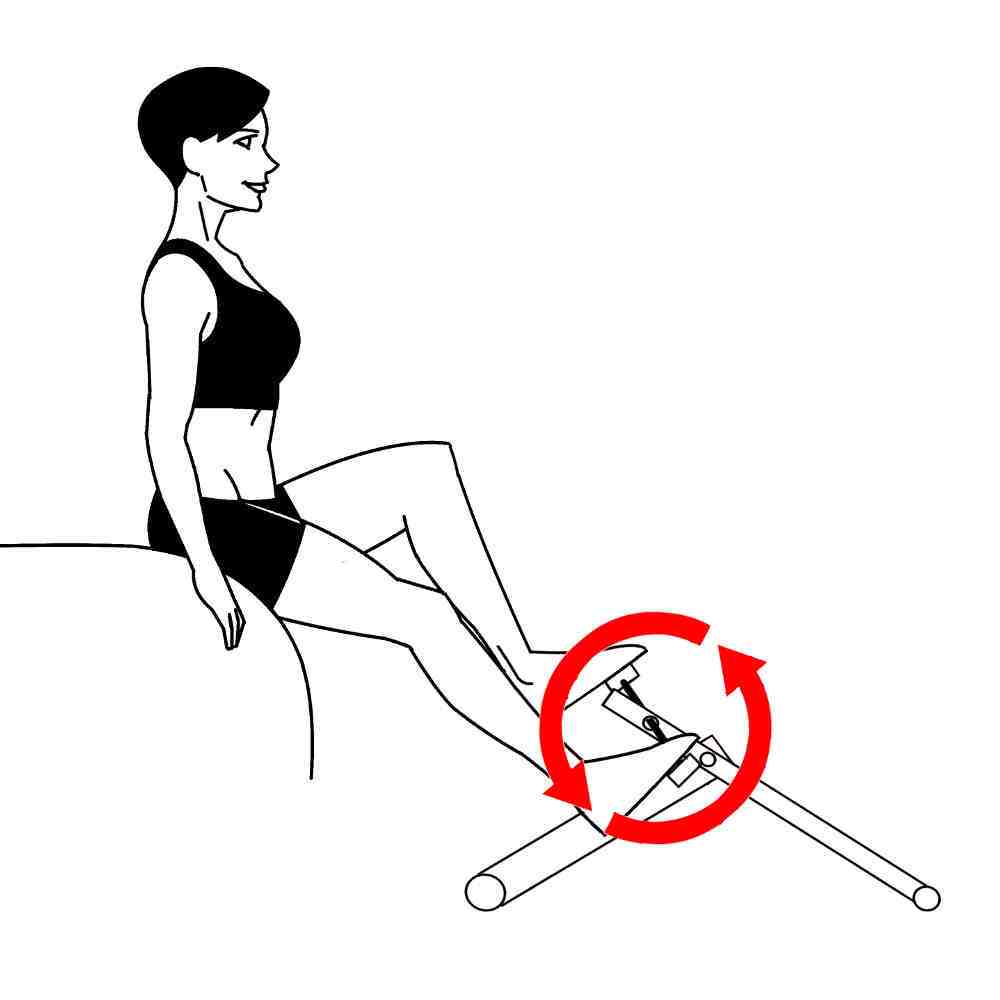
How Do I Use Excy XCS 200 Models for Chair Exercises to Pedal Legs?
In its lowest setting, the XCS 200 systems pedal like a long wheelbase recumbent with the device placed on the floor, resulting in a crankset that is significantly lower than the seat. Heights can then be adjusted upwards to the rider’s preference.
You can use Excy as a long wheelbase recumbent bike by simply placing it in front of a chair. It will scoot away if you push forward while pedaling. To keep stationary, pedal towards your body. Toggle ties can be used to tie the Excy system to the legs of a chair.
For those with the XCS 260 or XCS Pro:
- Place the Bar behind the front legs of a chair with four legs.
- Adjust the slide to your size (25-30 degree angle for the greatest pedaling power, comfort, and to prevent injury).
- Cycle with the Bar behind the chair legs.
- The provided toggle ties can be used to wrap around the Bar Pins on the Bar and wrapped around a chair’s legs or wheels for office chairs.
See the exercise setup page for details on how to use the Excy XCS 200 series to cycle from a chair or bedside.


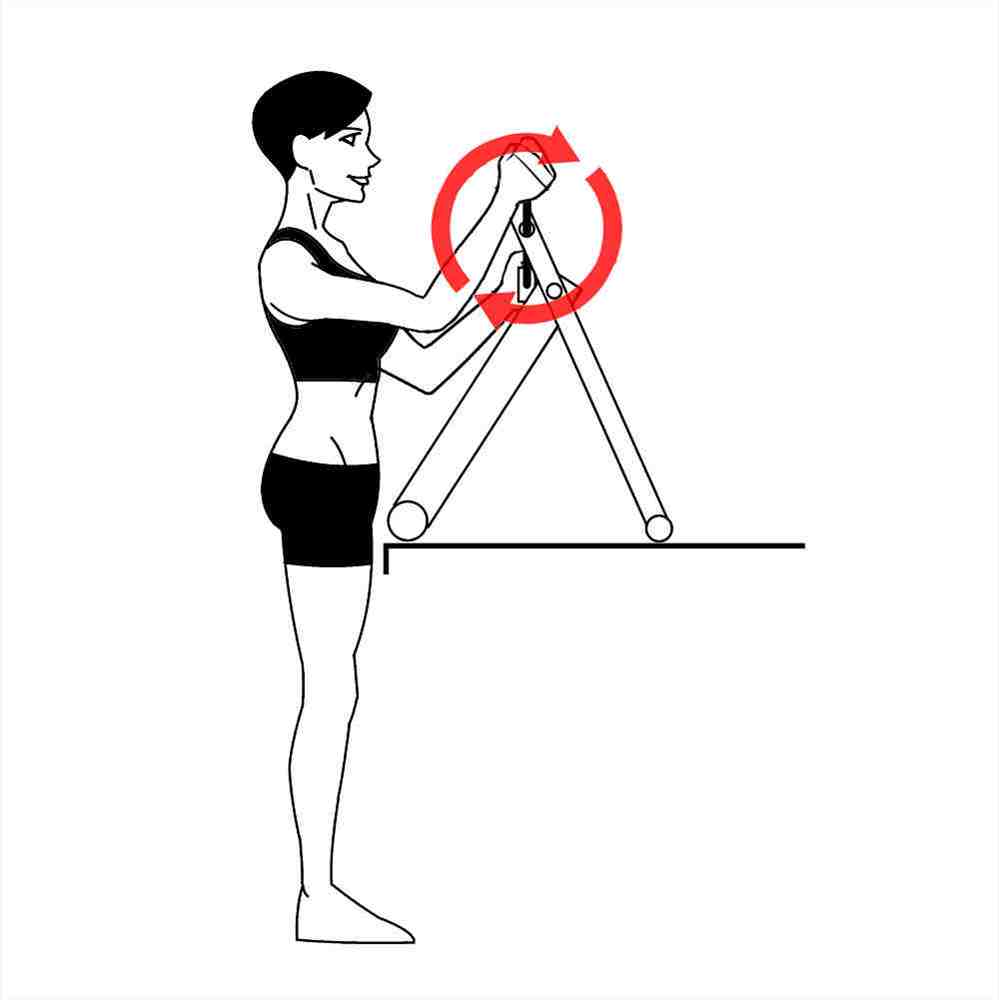
How Do I Pedal Arms with the Excy XCS 200 as a Tabletop Handcycle?
The XCS 200 systems can be used as a physical therapy quality upper body ergometer by simply placing the sysytem on a table top to pedal with your hands to strengthen your arms and shoulders.
The smooth bi-directional pedal motion, quiet operation and wide resistance range make it ideal for a wide range of upper body therapy or a rigorous workout at higher level of resistance.
Watch the video to get started:
Tabletop Handcycle Setup Specifics for Upper Body Resistance Training
- Place the opened Excy system on a table. Use the pin to adjust the height to your preference (top hole is optimal).
- Place the Rear Bar at the edge of the table with your feet securely in a comfortable position. To begin cranking, place the right crank arm in the top furthest position away from the body (between 2 and 3 o’clock). Place your right hand on the pedal and make sure you have a 5-10 degree bend at the elbow. The crank arm should be at its highest position and as close to the shoulder height at possible. Pivot the crank arms forward and adjust your feet and body positioning close or further away from the table so that your elbow is never locked or fully extended while pedaling.
- Ideal foot placement and body position depends on the goal of the user. Adjust the height of the cranks to a comfortable position that encourages proper posture or at the desired angle for specific training movements. If the axis is too high, there will be impingement at the 12 o’clock position. Too low and there can be a supraspinatus/biceps tendon strain at the 6 o’clock position. In most cases, it is ideal to set the axis level to the shoulder or just 1-2” below.
- The most ergonomically comfortable and safe hand position is grabbing the end of the pedals with palms facing each other. Make sure your thumb is not near the crank arm as it may get pinched during cranking. Hand pedals or hand gloves can be added for comfort. Exercise: Pedal forwards. As your right hand pushes forward and down, your left hand circles backward and up to complete the rotation of the pedals. Think about standing tall and focusing on good posture, but don’t get hyper extend through the spine at all. It’s important to not hunch forward.
- Keep your chin up, back straight, shoulders back, and your torso/core strong. Do not lock knees. Start easy for duration, intensity, and resistance levels as upper body muscles are smaller, weaker, and less efficient, which means it is easy to get very sore muscles almost immediately if you jump into high tension cranking motions that you are note use to. Squats, calf raises, jumping jacks, speed skate lunges, and one-legged balance exercises can be added to this position for additional complexity.
Click here for more information on using Excy as a tabletop handcycle and resistance trainer
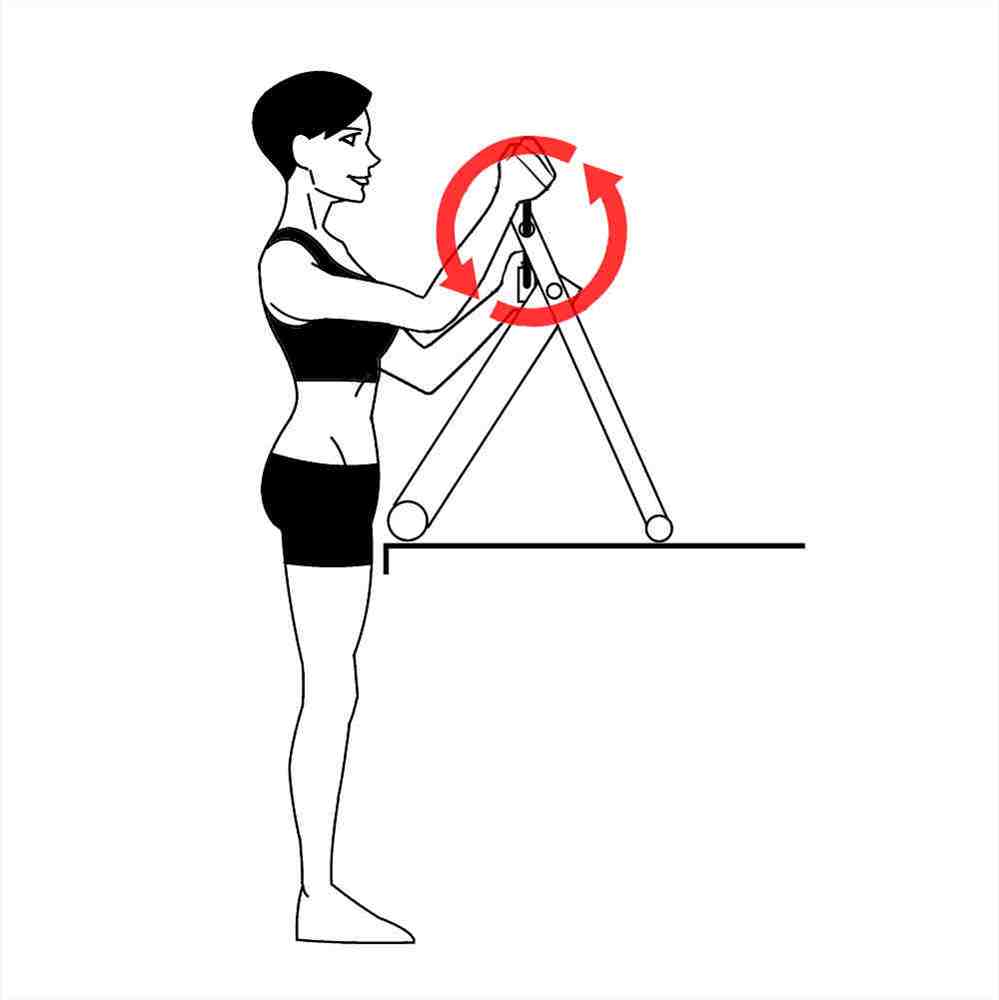

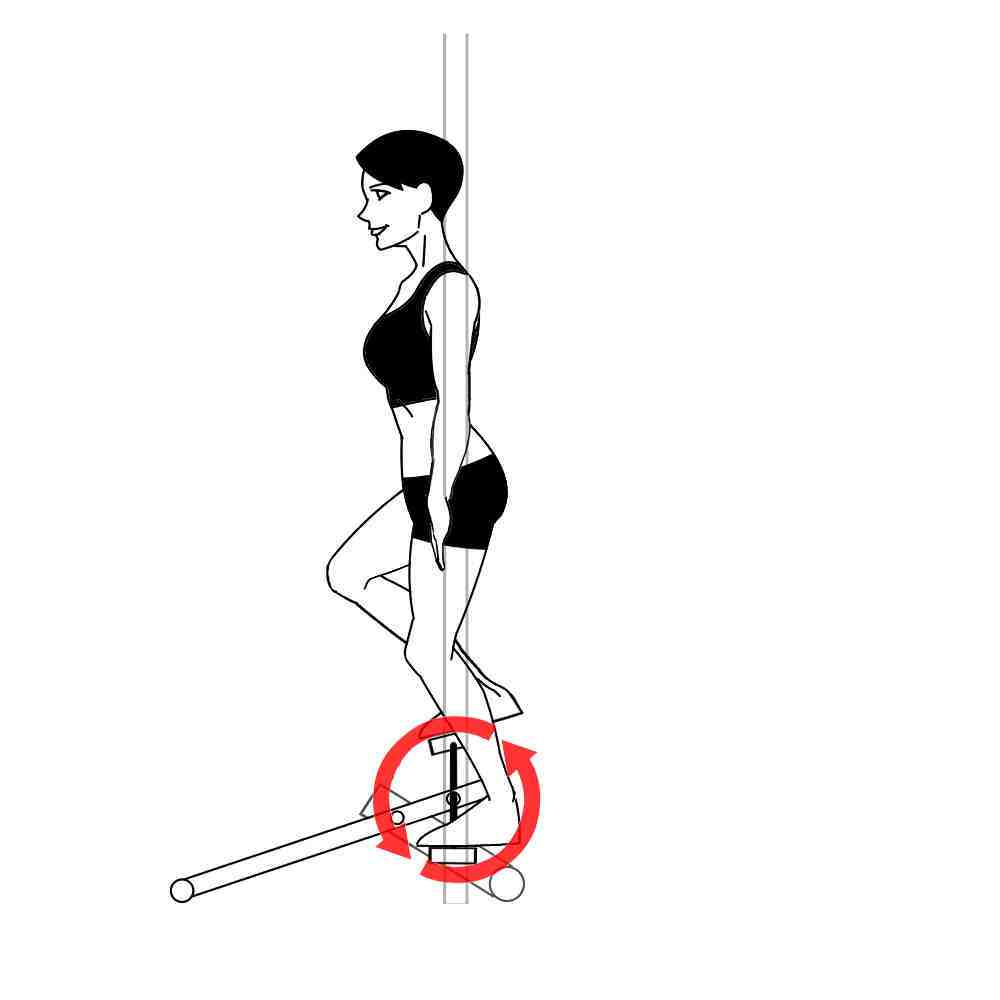
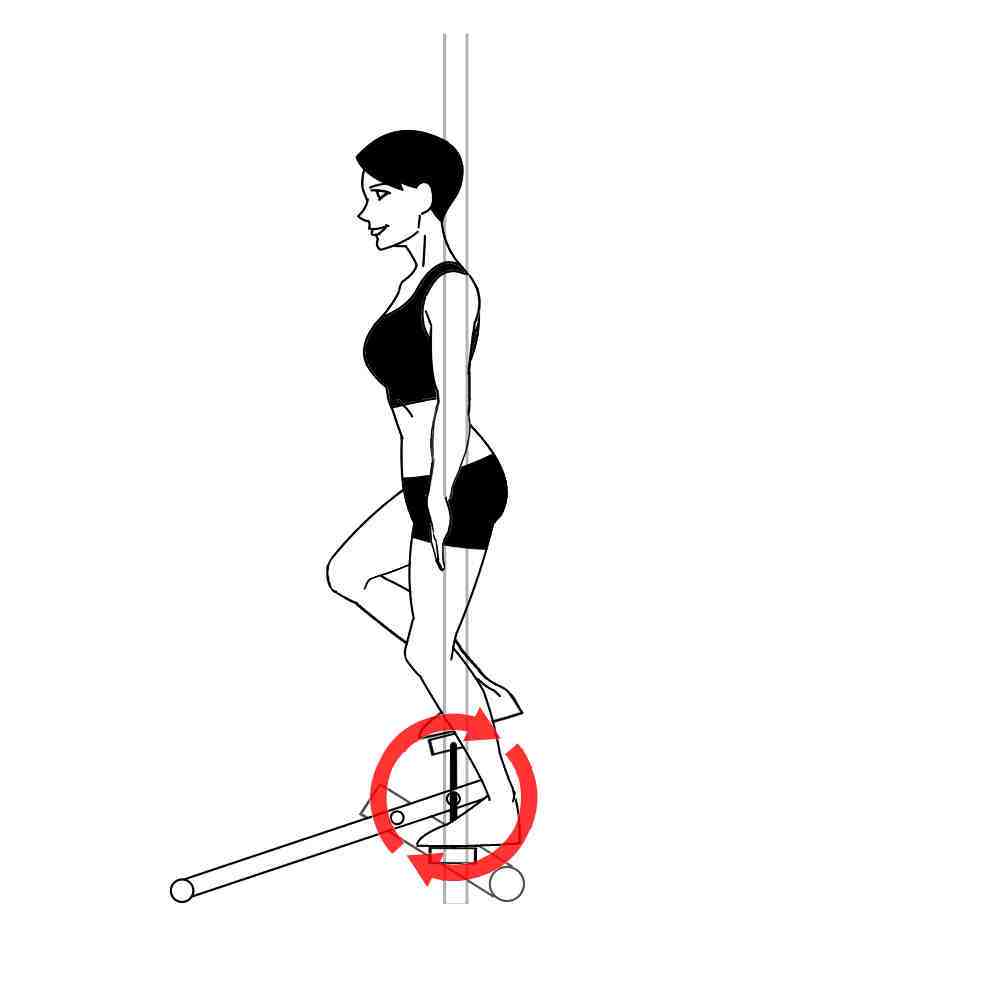
How Do I use the XCS 200 Series as a Step Cycle or Unicycle Resistance Trainer?
To get started in the standing position, the Adjustment Pin MUST BE REMOVED completely and the Slide fully inserted. Place the Adjustment Pin in the top Pin Holder when not in use to avoid losing it. The stability Bar must be attached. Add a moderate amount of resistance the first time. Place one hand on a stable surface that you can hold onto while cycling. Then place one and then both feet on Excy.
Embrace Pedaling Backwards
It’s often easier to coordinate getting familiar with this workout while starting in reverse first. Always hold onto a stable surface like a counter top, table, bench, desk, etc. when using Excy in the standing position. Walking or trekking sticks can be used with Excy, but require athletic coordination and can be dangerous. Do not use poles with springs.
Watch the video for setup:
Checkout setup page for proper unicycle and step cycling resistance trainer setup.

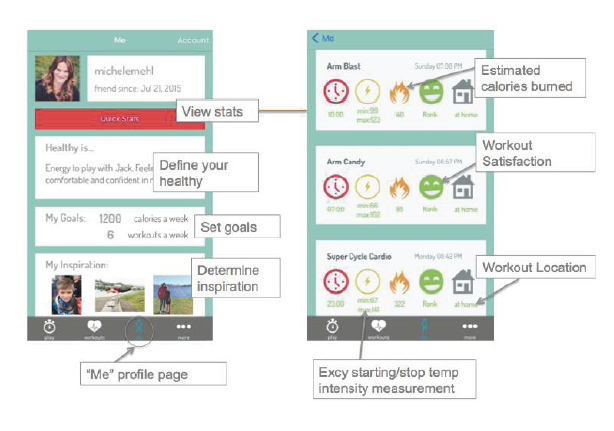
How does the Excy Mobile Coaching Application Work?
The Excy Mobile Coach interval training application and tutorial videos are not intended in anyway to be substitute for professional training advice or professional education. It is simply an informational tool for convenience purposes only. Before starting or changing an exercise routine, talk with your healthcare provider about how much and what kind of resistance training physical activity is safe for you.
Keep Track of Results to Stay Motivated and Inspired
Define your inspiration for what healthy means to you to stay motivated on your healthy journey. Upload photos of your inspiration for wanting to exercise in the first place as a constant reminder and motivator. Change out the pictures to fit your daily inspiration. Never question your motivation again!
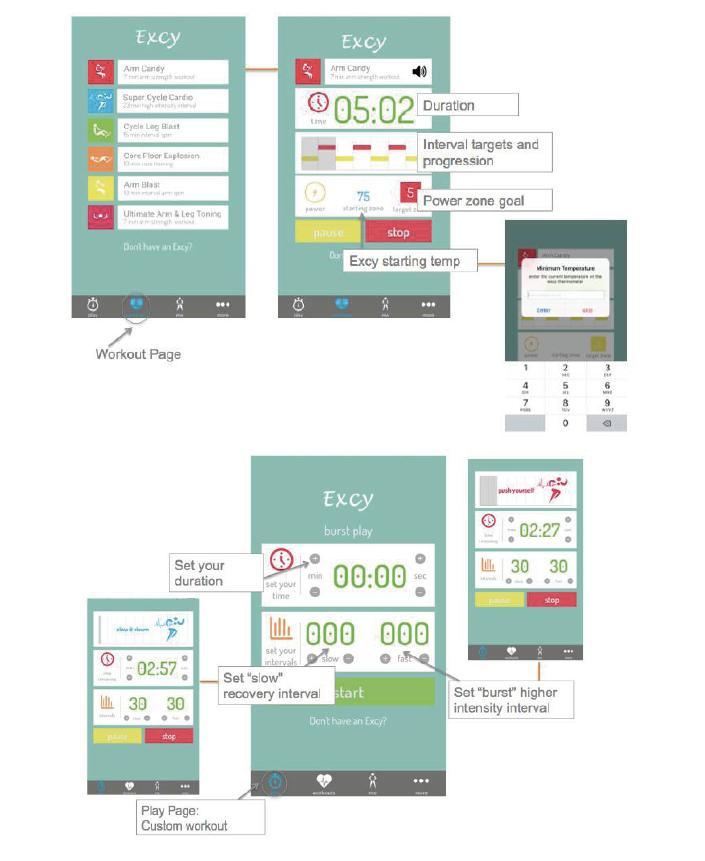
 Guided and On-Demand Workouts, Interval Training Clocks
Say goodbye to boring timed workouts on your phone and create a unique interval training workout that fits your mood, schedule, and location. Set your duration, create fast and slow intervals quickly with plus and minus buttons. Follow guided prompts to push yourself during your peak periods, as well as the prompt to let your body recover. Gain access to our on-demand fitness videos with personal coaching for the Excy upper body and lower body workouts. As more workouts are added to the Excy app, you will get access to those also. Great prompts for all Excy exercises, whether using as a portable exercise bike, upper body ergometer, or full-body resistance trainer.
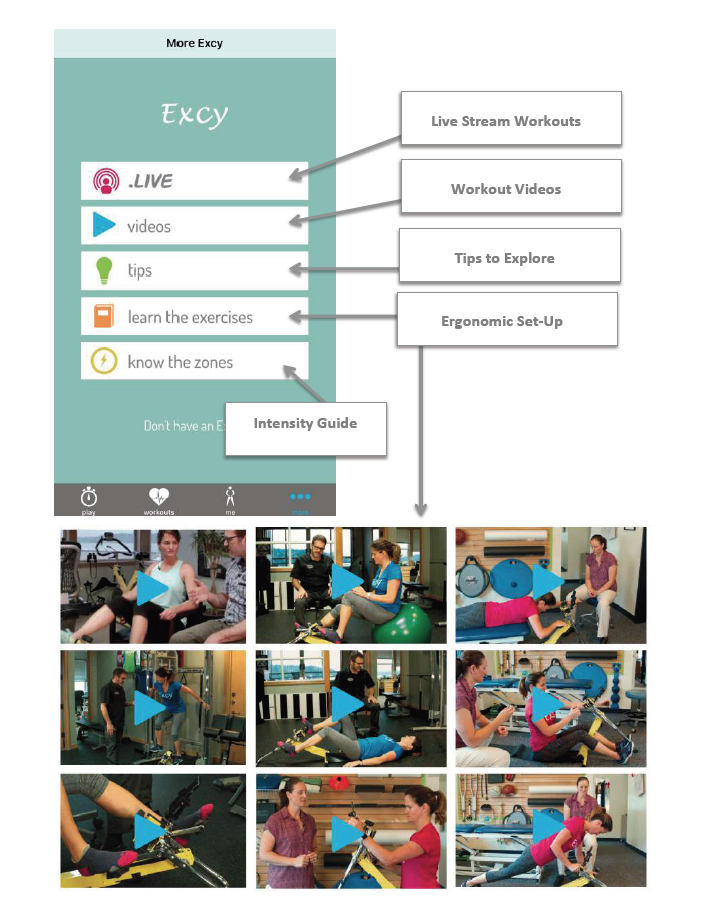
Video Tutorials from Physical Therapists for Proper Technique
How do I Maintain Excy XCS 200 Portable Exercise Bikes?
Monthly or after your first 20 hours: Make sure all bolts and screws are tight. Tighten as necessary. Always check pedals to make sure they are tight, especially if you are swapping out pedals frequently.
Cleaning Your Excy Portable Exercise Bike Resistance Training System
If you wish to clean your Excy system, use a water diluted mild detergent on painted parts only. Disinfectant wipes can be used on the painted parts and the Excy Keeper. Do not attempt to clean the bands used for resistance. Do not use petroleum-based products. Should your system ever squeak during use, we have found that a couple of drops of water (a teaspoon) placed directly onto the resistance webbing will eliminate squeaking. A small spray bottle with water will also work. It does not require a lot of water.
What is My Warranty on the Excy 200 Portable Exercise Bikes?
Excy Limitless Warranty
Excy Corp. shall cover the labor cost for the repair of defective Excy cycling system parts for a period of 12 months from the date of original purchase. This will be the case so long as the Excy cycling system remains in the possession of the original owner. If there is a defective component, we will arrange to return it and fix it at our cost. Limited Home-Use Warranty valid only in the United States.
If you believe your Excy resistance training system has a defective component, contact us at excy (at) excy (dot) com. You may be asked to provide a detailed description, photographs or a video to explain the problem. We will try to make this process as easy as possible, but we do need to understand the problem to help you get it fixed.
Limits to Coverage
This limited warranty does not cover defects that did not exist before the date of purchase. Specifically, this limited warranty does not cover any defect caused by:
- Damage or failure due to normal wear and tear, improper maintenance, theft, or installation of parts or accessories not originally intended for or compatible with the Excy System as sold.
- Surface scratches, surface corrosion or rust, discoloration of paint, or anything related to improper use.
- Damage or failure due to accident, abuse, corrosion, neglect, theft, vandalism, fire, flood, wind, lightning, freezing, or other natural disasters of any kind, unusual atmospheric conditions, collision, introduction of foreign objects into the resistance webbing, or modifications that are unauthorized or not recommended by Excy Corp.
- Incidental or consequential damages. Excy Corp. is not responsible or liable for indirect, special, incidental or consequential damages, economic loss, loss of property or profits, loss of enjoyment or use, or other consequential damages of any nature whatsoever in connection with the purchase, use, repair or maintenance of the equipment. Excy Corp. does not provide monetary or other compensation for any such repairs or replacement parts costs.
- Equipment used for commercial purposes or for any use other than a single family or household, unless endorsed by Excy for coverage.
- Delivery, assembly, installation, setup for original or replacement units or labor or other costs associated with removal or replacement of Excy.
- Any attempt to repair this equipment creates a risk of injury. Excy is not responsible or liable for any damage, loss or liability arising from any personal injury incurred during the course of, or as a result of, any repair or attempted repair of your Excy equipment by other than an authorized service technician. All repairs attempted by you on your Excy equipment are undertaken AT YOUR OWN RISK and Excy Corp. shall have no liability for any injury to person or property arising from such repairs.
- The warranty is limited to replacing or repairing, at the servicer’s and/or manufacturers sole option, the same or a comparable model.
- Replacement units, parts and electronic components reconditioned to as-new condition by Excy Corp. or its vendors may sometimes be supplied as warranty replacement and constitute fulfillment of warranty terms.
This warranty gives you specific legal rights, and your rights may vary from states to state.
Normal Wear and Tear
The wear and tear of these parts is excluded from any warranty. The service life of these parts will depend on the conditions under which the Excy cycling system is used.
As with all mechanical components, the Excy cycling system is subjected to wear and tear and high stresses. If the design life of a component has been exceeded, it may fail possibly causing injury or property damage. If the life of a component has been reached, it should be replaced. You can order replacement parts directly through Excy at excy.com.
Bumpers
Due to their use, the Bumpers are subject to wear and tear, especially when used on outdoor surfaces. You will need to replace the bumpers when visibly worn and they have reached their wear limit.
Keeper and Mat
Due to their use, the Keeper and Mat are subject to wear and tear. The fabric will wear and degrade, especially when used on outdoor surfaces. You will need to replace the Keeper and Mat when there are noticeable tear or fabric fibers are showing, at which point they will have reached wear limits.
Toggle Ties
Due to their use, the Ties are subject to high dynamic forces while Excy is in use. Please check these parts regularly for visible fraying or damage and replace them if necessary.
Toggles
Due to their use, the Toggles are subject to high dynamic forces while Excy is in use. Please check these parts regularly for visible damage and replace them if necessary.
Rubber Bands
Due to their use, the Rubber Bands are subject to stretching. Please check elasticity regularly for visible damage and replace them if necessary.
Voiding Your Excy Limited Warranty
You void your warranty by:
- Improper use for which the Excy cycling system is not intended.
- Making any unauthorized modifications to the Excy frame or components.